To create a mosaic patio table top, start by selecting durable materials like glass, ceramic, or stone tiles that withstand outdoor conditions. Prepare and level your surface, then plan and lay out your design before fixing each piece securely with outdoor-grade adhesive. Fill gaps with grout, wipe away excess, and seal the surface for waterproofing. Following these steps will help you craft a stunning, long-lasting mosaic table—continue on to discover detailed tips and techniques.
Key Takeaways
- Prepare a clean, level surface and plan your mosaic layout before applying adhesive.
- Choose durable, weather-resistant materials like glass, ceramic, or stone tiles suitable for outdoor use.
- Cut tiles into desired shapes and sizes to create a flexible, custom design.
- Secure tiles with outdoor-grade adhesive, then fill gaps with waterproof grout and clean excess.
- Seal the finished mosaic with a waterproof sealant to protect against the elements and extend durability.
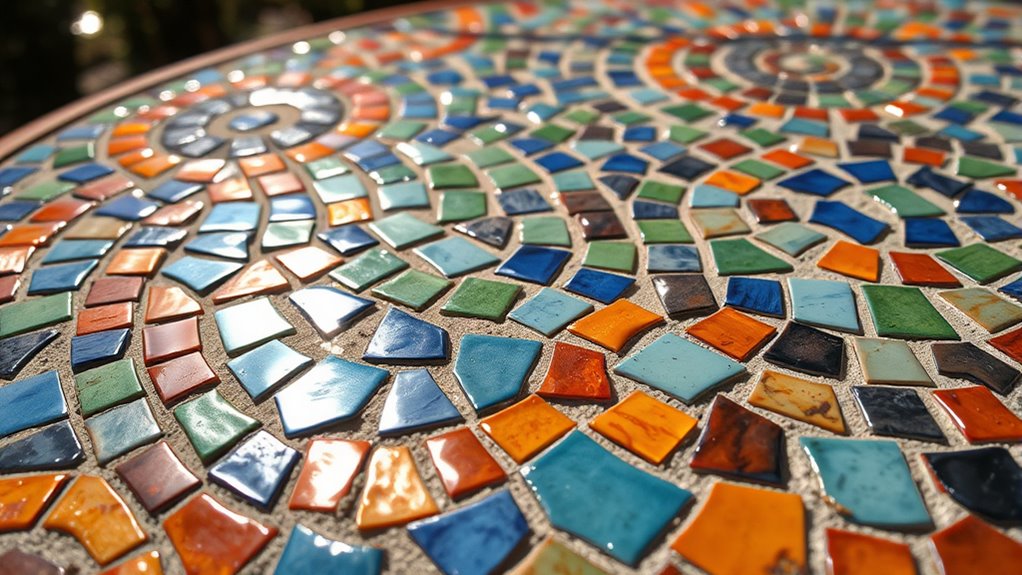
Creating a mosaic patio table top is a rewarding way to personalize your outdoor space and showcase your artistic flair. When you immerse yourself in this project, understanding the different types of mosaic can help you choose a style that fits your vision. You might opt for traditional tesserae made from small pieces of glass, ceramic, or stone, which are popular for their durability and vibrant colors. Alternatively, you could experiment with modern mosaic styles that incorporate larger, irregular pieces for a more abstract look. There are also intricate micro-mosaic techniques that use tiny tiles to create detailed images or patterns. Each type of mosaic offers a unique aesthetic, so consider what appeals most to your taste and the overall vibe you want your patio to convey.
Selecting the suitable materials is a critical step because it determines the longevity and appearance of your finished table top. When choosing materials, think about durability first, especially since your table will be exposed to outdoor elements. Glass tiles are a popular choice because they’re resistant to weather and come in a broad spectrum of colors, making your design pop. Ceramic tiles are another excellent option; they’re affordable, available in many styles, and can withstand outdoor conditions if properly sealed. Stone tiles, such as marble or granite, add a natural, elegant touch, though they may require more careful installation to prevent cracking. For grouting, opt for weather-resistant, flexible options that can withstand temperature fluctuations and moisture. When selecting your grout, consider colors that complement or contrast with your tiles to enhance your design. You might also incorporate other materials like mirror pieces, small beads, or even broken crockery to add texture and visual interest.
Before starting your project, prep your surface thoroughly by cleaning and leveling the table top. Cut your tiles into the desired shapes and sizes, keeping in mind the design you envision. Lay out your mosaic pieces without adhesive first to visualize the pattern and make adjustments. When you’re ready, apply a suitable adhesive or mortar designed for outdoor use, carefully placing each piece according to your layout. Once the mosaic is set, cover the surface with grout, pressing it into the gaps and wiping away excess to reveal clean lines. Finish by sealing the entire surface with a waterproof sealant to protect your mosaic from dirt, moisture, and UV damage. Additionally, utilizing a high-quality adhesive can ensure your mosaic remains securely attached over time, especially in outdoor conditions.
Frequently Asked Questions
What Materials Are Best for Outdoor Mosaic Table Tops?
For outdoor mosaic table tops, you should choose weather-resistant materials like glazed ceramic tiles, glass, or natural stone. Use a strong, outdoor-rated adhesive suitable for your tile type to guarantee durability. When selecting grout, pick one formulated for outdoor use that resists water and UV rays. These choices help your mosaic withstand the elements, keeping it looking vibrant and intact over time.
How Long Does It Take for the Adhesive to Cure?
You should expect the adhesive to cure in about 24 to 48 hours, but weather impact can extend this time. Humidity, temperature, and rain can slow down the curing process, so it’s best to work in dry, moderate conditions. To guarantee proper adhesion, avoid disturbing the mosaic during this period, and check the manufacturer’s instructions for specific curing times based on your adhesive type.
Can I Use Glass Mosaic Tiles Outdoors Year-Round?
Using glass mosaic tiles outdoors year-round is like trusting a sturdy umbrella in a storm—they’re durable if properly sealed. Glass tiles offer excellent seasonal durability, resisting weather changes and UV rays. To keep your mosaic shining, clean it with gentle soap and water regularly, avoiding harsh chemicals. Seal the tiles well before installation, and you’ll enjoy their beauty through all seasons, with minimal maintenance needed for lasting outdoor appeal.
What Are Common Mistakes to Avoid During Installation?
You should avoid rushing the grout color selection, as it impacts the overall look. Choose a grout color that complements your tiles and suits outdoor conditions. Additionally, improper sealing techniques can lead to water damage and staining. Make sure you seal the mosaic thoroughly after installation, especially around grout lines. Take your time, follow manufacturer instructions, and double-check your work to prevent common mistakes and ensure your mosaic patio table top lasts.
How Do I Repair Chipped or Damaged Mosaic Tiles?
Your mosaic tiles might be as delicate as glass, but don’t worry—you can fix chips easily. Start by cleaning the damaged area thoroughly, then carefully apply matching grout or adhesive to fill in the chip. Once dry, clean the tile to restore its shine. Afterward, verify your mosaic stays pristine by sealing the grout and regular tile cleaning, preventing future damage and keeping your patio table looking stunning.
Conclusion
Don’t let the fear of imperfections hold you back—mosaics are meant to be unique and personal. Every chip and uneven tile adds character, making your table truly one-of-a-kind. Embrace the process, enjoy each step, and remember that imperfections often add charm. After all, it’s the love and effort you put in that turn a simple project into a meaningful centerpiece for your outdoor space. Your mosaic table will be a reflection of your creativity and patience.