To make a DIY evaporative cooler, start by choosing lightweight, porous materials like fabric, mesh, or sponge for the cooling pads, ensuring they hold water well. Place the saturated pad at the air intake and use a small fan to blow across it, increasing evaporation. Keep the pad moist with a simple pump or soaked cloth and seal any gaps for maximum efficiency. For more detailed steps, you’ll discover effective tips to build an affordable, cool space.
Key Takeaways
- Use porous, water-retentive materials like fabric, mesh, or sponge to maximize evaporation and cooling efficiency.
- Position a saturated cooling pad at the air intake, sealing gaps to prevent uncooled airflow bypass.
- Select a lightweight, water-holding container such as a plastic bin or wooden box for water reservoir stability.
- Employ a small fan to blow across the moist pad, enhancing airflow and evaporation for better cooling.
- Maintain a steady water supply with a simple pump or soaked cloth to keep the pad saturated during operation.

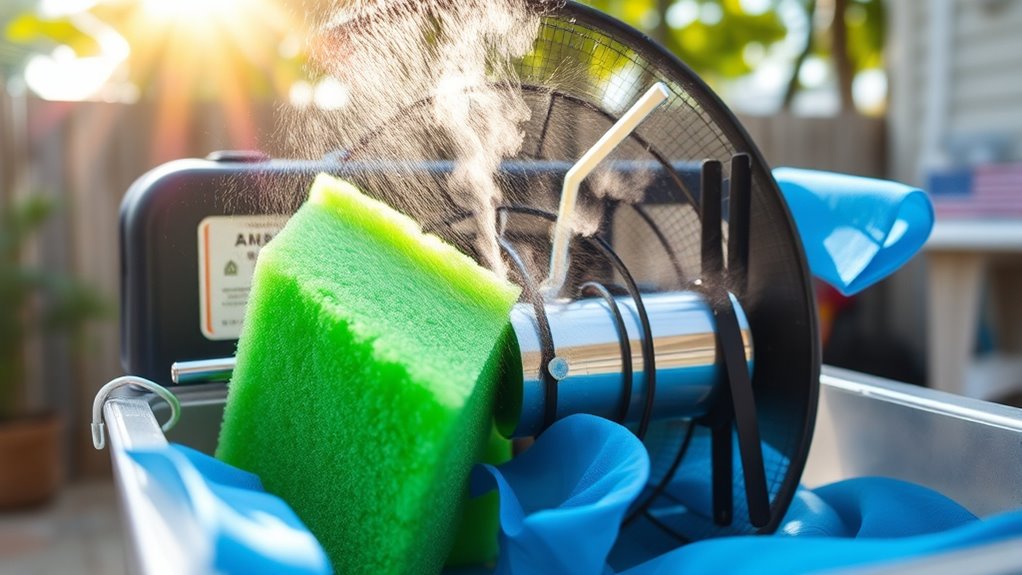
Ever wondered how to beat the heat without breaking the bank? Building a DIY evaporative cooler is an excellent way to stay cool while saving money. The key to making your cooler effective lies in understanding cooling efficiency, which depends heavily on your material selection. When choosing materials, you want options that maximize airflow while promoting effective evaporation. Lightweight, porous materials like certain types of fabric or mesh allow air to pass through easily, increasing the cooling effect. You might also consider using materials with high water retention, such as wood or specific types of sponge, to keep the evaporative process consistent. Avoid dense or non-porous materials, as they hinder airflow and reduce cooling efficiency. Selecting materials with high water retention capabilities can significantly boost your cooler’s performance by maintaining consistent evaporation. Start by selecting a container or box that will serve as the main housing for your cooler. It should be large enough to hold water and the cooling medium, but manageable enough to set up comfortably. A plastic bin or a wooden box works well because they’re lightweight and durable. Next, choose a material for the cooling pad—this is where most of the evaporation happens. You could use a thick piece of sponge, a bundle of mesh or fabric strips, or even a DIY cardboard honeycomb structure lined with a water-absorbent material. The goal is to ensure the pad has enough surface area to maximize water evaporation as air passes through.
Choose porous, water-retentive materials like fabric, mesh, or sponge to maximize airflow and cooling efficiency.
The material selection doesn’t stop there. Make sure your water supply setup is effective—use a simple pump or a soaked cloth that remains moist. When you assemble your cooler, position the cooling pad at the air intake, ensuring it stays saturated but not flooded. This positioning allows the air to pass through the wet material, picking up moisture and cooling as it moves into your space. Seal any gaps around the cooling pad to prevent warm, uncooled air from slipping past. The better the seal, the higher your cooling efficiency.
Finally, consider how you’ll generate airflow. A small fan positioned to blow across the moist cooling pad can greatly improve cooling performance. When selecting a fan, opt for one with adjustable speed settings so you can find the perfect airflow for your environment. Remember, the success of your DIY evaporative cooler hinges on smart material selection and proper setup. Use porous, water-retentive materials and ensure good airflow to maximize cooling efficiency. With some simple tools and thoughtful choices, you can create an effective, budget-friendly cooler that keeps you comfortable during hot weather.
Frequently Asked Questions
Can I Use Any Type of Fan for This Cooler?
You can’t use any fan for your cooler if you want ideal efficiency. Look for a fan compatible with your cooler’s size and airflow needs, like a box or oscillating fan. Proper fan compatibility ensures maximum airflow, which boosts cooler efficiency. Avoid mismatched fans, as they can reduce cooling performance and increase energy use. Choose a fan that matches your design for the best cooling results on hot days.
How Often Should I Replace the Water in the Cooler?
You should replace the water in your cooler daily to maintain water quality and efficiency. As water evaporates, contaminants can build up, reducing cooling effectiveness and potentially causing odors. Regularly changing the water also helps manage the evaporation rate, ensuring your cooler works most effectively. If you notice cloudy or foul-smelling water, replace it immediately to keep your cooling system clean and functioning properly.
Is It Safe to Use Household Chemicals to Enhance Cooling?
Using household chemicals for cooling enhancement is like adding spice to a dish—sometimes it’s tempting, but it can easily ruin the flavor. It’s not safe to mix household chemicals with water in your cooler, as they can produce toxic fumes or damage your device. Stick to water and natural methods; they’re safer and more effective, ensuring your cooler cools without risking health or safety.
What Maintenance Is Required to Keep the Cooler Functioning?
You need to regularly clean the filter to guarantee ideal airflow and prevent mold buildup. Check and replace the water frequently to maintain water quality, which keeps your cooler working efficiently. Also, inspect for any mineral deposits or debris and clean them out. By maintaining your cooler with filter cleaning and fresh water, you’ll extend its lifespan and keep it running smoothly during hot days.
Can This Cooler Be Used Indoors Safely?
Yes, you can use this cooler indoors safely, but you should prioritize indoor safety and be aware of chemical concerns. Keep the area well-ventilated to prevent humidity buildup and avoid using any chemicals or fragrances that could emit harmful fumes. Regularly clean the cooler to prevent mold and bacteria. By staying cautious, you’ll enjoy a invigorating breeze without risking indoor air quality or safety.
Conclusion
Now that you’ve built your DIY evaporative cooler, you’re all set to beat the heat naturally. Remember, a little effort goes a long way—”A stitch in time saves nine.” By maintaining your cooler and staying mindful of the weather, you’ll stay cool and comfortable without breaking the bank. Keep experimenting and adjusting as needed, and you’ll find that simple solutions often work best. Stay cool and enjoy the sunshine, knowing you’ve created your own invigorating oasis!