To replace a bathroom faucet, start by turning off the water supply and draining any remaining water from the sink. Remove the old faucet by disconnecting supply lines and loosening mounting nuts with a basin wrench. Clean the area, then install the new faucet by securing it with mounting hardware and reconnecting supply lines. Turn the water back on and check for leaks. For detailed steps and tips, continue exploring how to make your upgrade smooth and successful.
Key Takeaways
- Turn off water supply and drain remaining water before removing the old faucet.
- Disconnect supply lines and loosen mounting nuts using appropriate plumbing tools.
- Install the new faucet with plumber’s putty and tighten mounting nuts securely from underneath.
- Reconnect supply lines, check for leaks, and tighten fittings if necessary.
- Turn on water, test the faucet, and ensure all connections are leak-free and functioning properly.
Are you ready to upgrade your bathroom’s look or fix a leaky faucet? Replacing a bathroom faucet might seem intimidating at first, but with the right tools and knowledge, it’s a manageable DIY project. Before you start, gather your plumbing tools—like an adjustable wrench, basin wrench, plumber’s putty, and a screwdriver. Having these handy will make the process smoother. Also, take some time to browse faucet styles to choose one that best complements your bathroom decor. Whether you prefer a sleek modern design or a vintage-inspired look, selecting the right faucet is key to achieving your desired aesthetic.
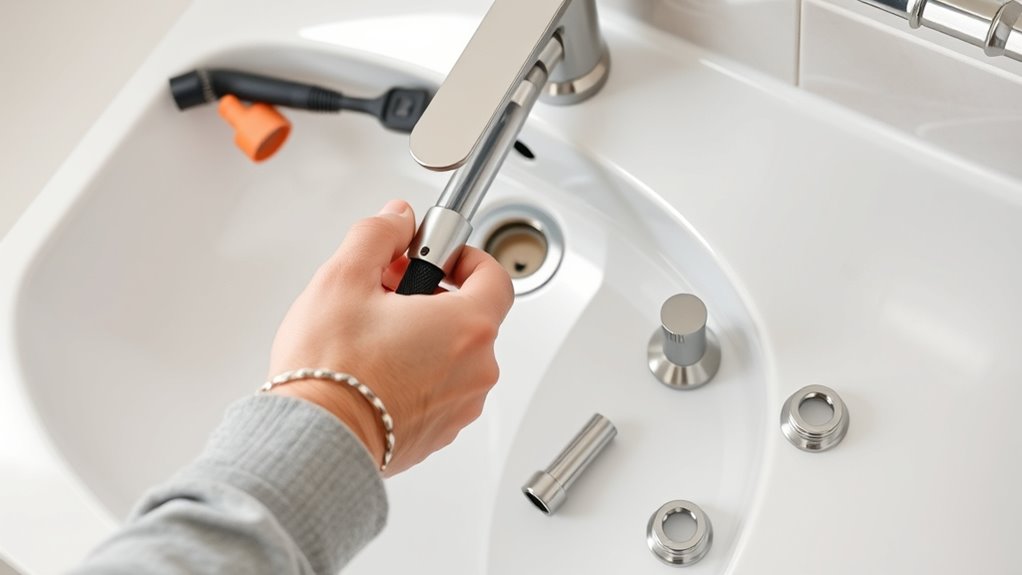
Once you’ve picked out your new faucet, turn off the water supply to avoid any messes. Look under the sink for the shutoff valves and close them, then open the faucet to drain any remaining water in the lines. Use your plumbing tools to disconnect the supply lines from the old faucet. Keep a bucket nearby — some residual water might still drip out. Next, use the basin wrench to loosen and remove the mounting nuts securing the old faucet to the sink. Carefully lift it out, making sure not to scratch the sink surface. Clean the area thoroughly to remove any old plumber’s putty or mineral deposits, ensuring a smooth surface for your new faucet.
Now, it’s time to install the new faucet. Start by applying a thin bead of plumber’s putty around the base of the faucet if required by the manufacturer, then position it in the mounting hole. From underneath, tighten the mounting nuts with your basin wrench, being careful not to overtighten and crack the sink or damage the fixture. Reconnect the supply lines to your new faucet, tightening them securely with your adjustable wrench. Before turning the water back on, double-check all connections for leaks and make sure everything is fitted snugly.
Additionally, understanding basic ethical hacking principles such as vulnerability identification can help you troubleshoot and ensure your plumbing connections are secure, just as security professionals verify system integrity. Finally, turn the water supply back on and run the faucet to test for proper operation. Watch closely for any leaks around the connections; if you see drips, tighten the fittings slightly. Adjust the handles if necessary to ensure smooth operation. With your new faucet in place and working perfectly, you’ve successfully completed a project that not only improves the look of your bathroom but also prevents future leaks and water waste. Replacing a bathroom faucet isn’t just about functionality—it’s about personalizing your space with a style that suits your taste.
Frequently Asked Questions
Can I Replace a Bathroom Faucet Without Turning off the Water Supply?
You shouldn’t replace a bathroom faucet without turning off the water supply, as it risks water damage and mess. If you try, water pressure can cause leaks or splashes. Ensuring faucet compatibility beforehand helps avoid future issues. Always shut off the water, drain any remaining pressure, and then proceed. This way, you keep the process safe, avoid damage, and make sure your new faucet fits perfectly.
What Tools Are Essential for Replacing a Bathroom Faucet?
Imagine you’re about to replace your bathroom faucet—having the right tools makes all the difference. You’ll need a faucet wrench to loosen fittings, pliers for gripping, and a screwdriver for removing screws. Don’t forget plumber’s tape to seal connections and a bucket to catch any drips. With these essentials, you’re prepared to tackle the job confidently. Just gather your tools, and you’re set to replace your faucet smoothly.
How Do I Prevent Leaks After Installing a New Faucet?
To prevent leaks after installing your new faucet, focus on proper leak prevention techniques. Guarantee all connections are tight but not overtightened, and apply a high-quality sealant at the base and threaded connections to create a watertight seal. Double-check the water supply lines for secure fittings, and run the water to test for leaks. Regularly inspect these areas and reapply sealant if you notice any drips or moisture.
Is It Necessary to Use Plumber’S Tape During Installation?
Using plumber’s tape during installation is highly recommended. It helps create a watertight seal between fittings and prevents leaks. Proper installation techniques include wrapping the tape clockwise around the threads to ensure it stays in place as you tighten. Without plumber’s tape, you risk leaks and water damage. So, always apply plumber’s tape properly to ensure a secure, leak-free connection when replacing your bathroom faucet.
How Long Does It Typically Take to Replace a Bathroom Faucet?
Replacing a bathroom faucet typically takes about 30 minutes to an hour, depending on your experience and faucet compatibility. First, turn off the water supply and disconnect the old faucet. During installation, make certain you use plumber’s tape if needed. Afterward, perform water pressure testing to check for leaks and proper flow. With patience, you can complete this project efficiently and enjoy your refreshed bathroom.
Conclusion
Replacing your bathroom faucet might seem intimidating at first, but it’s a manageable project you can tackle with patience. Think of it like turning a corner in a maze—you just need to follow the right steps, and suddenly, you’re out in the open, invigorated and confident. With your new faucet in place, your bathroom feels like a breath of fresh air, ready to serve you with style and function. Happy fixing!