
To install a dimmer switch, turn off power at your circuit breaker and use a voltage tester to verify the circuit is dead. Remove the existing switch and note how the wires are connected. Connect the black (hot) wire to the dimmer’s terminal, attach the load wire, and connect the ground wire if available. Secure everything, mount the switch, and turn the power back on. If you want to know more, follow the steps carefully for a safe and effective upgrade.
Key Takeaways
- Turn off power at the circuit breaker and verify the circuit is dead using a voltage tester.
- Remove the existing switch and note wire connections before disconnecting.
- Connect the dimmer’s black terminal to the hot wire, load wire to the other terminal, and ground wire if available.
- Securely attach the dimmer switch to the electrical box and replace the cover plate.
- Restore power, then test the dimmer for proper operation and smooth dimming functionality.
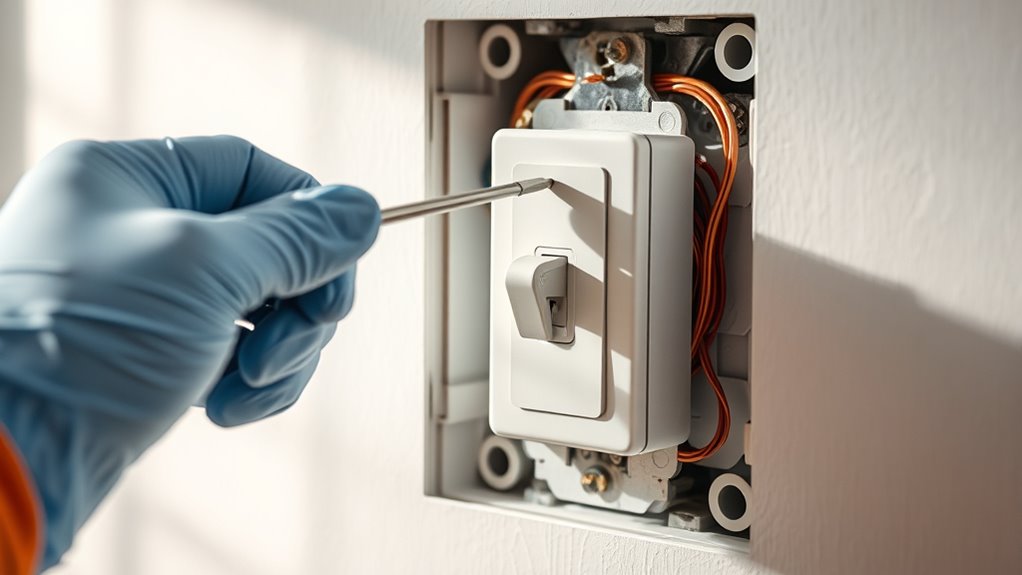
Installing a dimmer switch is a straightforward project that can instantly improve your home’s lighting and ambiance. Before you start, it’s crucial to prioritize wiring safety. Turn off the power at your circuit breaker to confirm no current flows through the wires you’ll be working on. Use a voltage tester to double-check that the circuit is dead. This step prevents electrical shocks and keeps you safe throughout the process. Once you’re confident the power is off, remove the existing switch cover plate and unscrew the current switch from the electrical box.
As you disconnect the wires, note how they are connected. Typically, you’ll find a hot wire (usually black), a neutral wire (white), and possibly a ground wire (green or bare copper). When working with wiring, make sure to handle all wires with insulated tools and avoid touching exposed conductors. Proper wiring safety isn’t just about turning off the power; it’s about being cautious and methodical to prevent short circuits or damage. When installing the new dimmer switch, confirm it’s compatible with your existing wiring setup and, importantly, with the bulbs you plan to use. Not all dimmers work with LED or CFL bulbs, so check the packaging or product specifications for compatibility. Using incompatible bulbs can cause flickering or damage the dimmer switch, so double-check that your chosen bulbs are suitable for dimming.
Note how wires connect, verify dimmer compatibility, and ensure bulbs are suitable for dimming to prevent flickering or damage.
Connect the wires according to the manufacturer’s instructions. Usually, this involves attaching the black (hot) wire from the wall to the black or dark-colored terminal on the dimmer, and the load wire to the other terminal. If your dimmer has a grounding terminal, connect the ground wire to it. Tighten all connections securely, but don’t overtighten, as this can damage the wires or the switch. Once everything is connected, carefully tuck the wires back into the electrical box, attach the switch to the box with screws, and replace the cover plate.
After installation, turn the power back on at the breaker. Test the dimmer to ensure it’s functioning correctly. If the lights flicker or don’t dim smoothly, double-check that your bulbs are compatible and that all connections are secure. Keep in mind that the right combination of wiring safety and compatible bulbs ensures not only the longevity of your dimmer switch but also your safety and the proper functioning of your lighting system. Incorporating proper wiring techniques can help prevent issues and ensure a safe, effective installation process. Taking these precautions makes the installation process smooth, safe, and effective.
Frequently Asked Questions
Can I Replace a Standard Switch With a Dimmer Without an Electrician?
You can replace a standard switch with a dimmer if you check switch compatibility and wiring requirements first. Make sure the dimmer is compatible with your lighting type and that your existing wiring matches the dimmer’s needs. If you’re comfortable working with electrical components and understand wiring, you might do it yourself. However, if you’re unsure or face complex wiring, it’s safer to hire an electrician to avoid hazards.
Are Dimmer Switches Compatible With LED or CFL Bulbs?
Dimmer switches can be compatible with LED and CFL bulbs, but you need to check the LED compatibility first. Many modern dimmers are designed specifically for LEDs, guaranteeing smooth dimming without flickering. For CFL bulbs, consider CFL considerations, as some may not dim properly or could flicker. Always verify the switch’s specifications and choose one labeled for LED or CFL use to ensure peak performance and safety.
What Safety Precautions Should I Take Before Installing a Dimmer?
Before installing a dimmer switch, you should prioritize safety. Always turn off the power at the circuit breaker to prevent electrical shock. Use proper tools like insulated screwdrivers and voltage testers to handle wiring safely. Double-check that the power is off before touching any wires. Wearing rubber gloves is also a good idea. Taking these precautions guarantees you avoid electrical shock and complete the installation safely and effectively.
How Do I Troubleshoot if the Dimmer Switch Flickers?
If your dimmer switch flickers, start troubleshooting by identifying flickering causes like loose wiring, incompatible bulbs, or a faulty switch. Check all connections to make certain they’re tight, and replace any dimmable bulbs that aren’t compatible. Sometimes, the dimmer itself might be faulty, so consider testing with a different switch. Troubleshooting tips include turning off power before inspecting and consulting the dimmer’s instructions for compatibility issues.
Do Dimmer Switches Require a Neutral Wire for Installation?
Dimmer switches often require a neutral wire for installation, especially in newer homes with modern wiring. Knowing about neutral wire requirements guarantees safe and proper installation. If your switch doesn’t have a neutral wire, you might need a model designed for that setup or consult an electrician. Always prioritize installation safety by turning off power before working and following manufacturer instructions to avoid electrical hazards.
Conclusion
Installing a dimmer switch is a simple way to improve your lighting and save energy. With just a few tools and some basic safety precautions, you can upgrade your home quickly. Did you know that using dimmer switches can cut lighting energy use by up to 40%? So, take the plunge—enhance your space and save on electricity bills. Your brighter, more efficient home is just a switch away!