To create an accent wall with reclaimed wood, start by selecting the wood type that fits your style, such as weathered barn or vintage pallets. Clean, sand, and treat the wood to guarantee it’s safe and ready for installation. Plan a layout that complements your room’s design, whether horizontal, vertical, or herringbone. Carefully install the pieces using proper fasteners, then finish with protective sealants. Continue to explore how each step shapes a unique, rustic feature that adds warmth and character to your space.
Key Takeaways
- Select reclaimed wood that complements your decor style and adds rustic charm to the space.
- Properly clean, sand, and seal the wood to ensure safety, durability, and a polished appearance.
- Plan your layout and design, considering wall size and visual interest through patterns like herringbone or vertical planks.
- Install the wood with appropriate fasteners, ensuring even spacing and a seamless, secure finish.
- Apply protective finishes to preserve the wood’s character and create a warm, inviting focal point in the room.
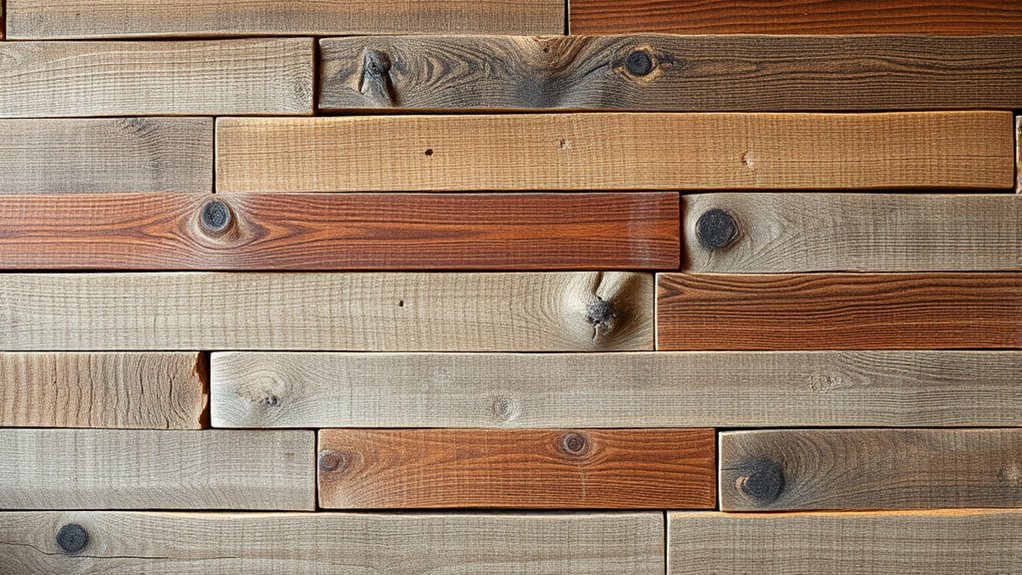
If you’re looking to add warmth and character to your space, creating an accent wall with reclaimed wood is an excellent choice. This approach not only elevates the aesthetic but also brings a sense of history and texture into your environment. To start, you’ll want to consider the type of reclaimed wood that best fits your design vision. Whether it’s weathered barn wood, vintage pallet planks, or salvaged hardwood, each piece offers a unique story and visual appeal. Once you’ve selected your materials, the next step is understanding wood treatment. Proper wood treatment ensures the reclaimed pieces are clean, safe, and ready for installation. This might involve cleaning, sanding, or applying sealants to enhance durability and appearance. Many DIY enthusiasts prefer natural finishes that highlight the wood’s rustic charm, while others opt for staining or painting to match their decor. Whatever your choice, wood treatment plays a vital role in achieving a polished, cohesive look.
Selecting and treating reclaimed wood transforms your space with rustic charm and lasting character.
When planning your accent wall, think about the design inspiration that guides your project. Do you want a modern rustic vibe, a vintage charm, or something more eclectic? Your inspiration will influence the layout and installation style. For example, a herringbone pattern can lend a sophisticated touch, while a simple vertical or horizontal arrangement emphasizes the natural grain and texture. As you assemble your design, keep in mind the wall’s scale and the room’s overall aesthetic to ensure harmony. Using reclaimed wood adds a layer of authenticity and depth, so don’t shy away from mixing different wood tones or textures for a more dynamic effect. The key is balancing the visual interest without overwhelming the space. Additionally, understanding the expiration of the wood, such as how long reclaimed materials have been stored or aged, can impact your choice and final appearance.
Installation is straightforward but requires patience. Ensure the wall surface is clean and flat before starting. Use appropriate fasteners and adhesives depending on the wood’s weight and your chosen layout. Take your time aligning each piece to maintain even spacing and a seamless look. Once installed, you may want to apply a clear protective coat or oil to enhance the wood’s natural beauty and longevity. This final step not only preserves the reclaimed wood but also amplifies its character, making your accent wall a focal point that tells a story.
Ultimately, creating an accent wall with reclaimed wood is about blending creativity with craftsmanship. With careful attention to wood treatment and a clear design inspiration, you can craft a stunning feature that adds warmth, texture, and a touch of history to your space.
Frequently Asked Questions
How Do I Prepare Reclaimed Wood for Installation?
You should start by sourcing reclaimed wood from trusted suppliers, guaranteeing it’s free of pests and rot. Next, clean the wood thoroughly and let it dry completely. Sand rough edges to smooth surfaces, and consider applying finishing techniques like sealing or staining for durability and aesthetic appeal. Proper preparation ensures your reclaimed wood is ready for installation, giving your accent wall a polished, authentic look that lasts.
What Tools Are Necessary for Installing Reclaimed Wood?
Did you know that using the right tools can cut installation time by up to 30%? For installing reclaimed wood, you’ll need a circular saw, tape measure, level, nail gun or hammer, and safety gear. Sanding techniques are essential for smooth finishes, and finishing options like stain or sealant enhance the look and durability. With these tools and techniques, you’ll create a stunning, professional-looking accent wall efficiently.
How Do I Ensure Safety When Working With Reclaimed Wood?
To guarantee safety when working with reclaimed wood, always wear appropriate safety gear like gloves, goggles, and a dust mask to protect yourself from splinters, dust, and debris. Before starting, identify hazards such as loose nails, mold, or rot, and address them carefully. Keep your workspace organized and well-ventilated, and handle tools responsibly to prevent accidents. Staying vigilant and prepared helps you work safely and efficiently.
Can Reclaimed Wood Be Used in High-Moisture Areas?
Yes, reclaimed wood can be used in high-moisture areas if you prioritize moisture resistance. You should treat the wood properly with a sealant or wood treatment designed to withstand moisture and prevent mold or rot. Applying these protective finishes ensures the reclaimed wood stays durable and maintains its appearance. Always choose reclaimed wood that has been properly dried and treated for high-humidity environments to ensure longevity.
How Do I Maintain and Clean My Reclaimed Wood Accent Wall?
You might worry about damaging your reclaimed wood accent wall, but proper cleaning techniques make it simple. Use a soft cloth or vacuum regularly to remove dust and debris, and gently wipe with a damp cloth for spots. Maintenance tips include avoiding harsh chemicals and excessive moisture, which can damage the wood. With consistent care, your reclaimed wood wall stays beautiful and retains its charm for years.
Conclusion
Don’t let worries about cost or time hold you back—creating an accent wall with reclaimed wood is more accessible than you think. The effort you put in pays off with a stunning, unique feature that adds warmth and character to your space. Remember, it’s not just about the wood; it’s about crafting a personal touch that reflects your style. Embrace the process, and enjoy the transformation you bring to your home.